
Contents
Why do we need to evacuate an air conditioning system or a refrigeration system before charging?
Refrigerant evacuation is the process of removing air, moisture, and any remaining refrigerant from a refrigeration or air conditioning system. It is typically done before performing maintenance, repairs, or recharging the system with new refrigerant.

All the refrigeration systems are designed to run without moisture and non-condensable gases; else it may not work as designed and is likely to fail prematurely.
The presence of moisture in the air conditioning system may lead to the formation of acidic sludge. It may cause restrictions on various places like expansion valves, evaporator coils, reducing the overall cooling effect.
In case of a hermetic compressor, it may cause deterioration of the insulation winding, leading to a short circuit and compressor motor burnout.
Non-condensable gases are just air that can enter during refrigerant charging, repair, or maintenance. These gases take up space in the condenser and limit the amount of liquid refrigerant leading to reduced cooling efficiency.
Evacuation is carried out by using a vacuum pump and a recovery bottle, ones the system evacuates. We need to wait for about 20-25 min to check the pressure gauge is holding the negative pressure (vacuum) as shown in the image.
This process may ensure that there are no leakages in the system as chances of air or moisture could enter via pipe cracks or leaky gaskets or joints while performing evacuation procedures.
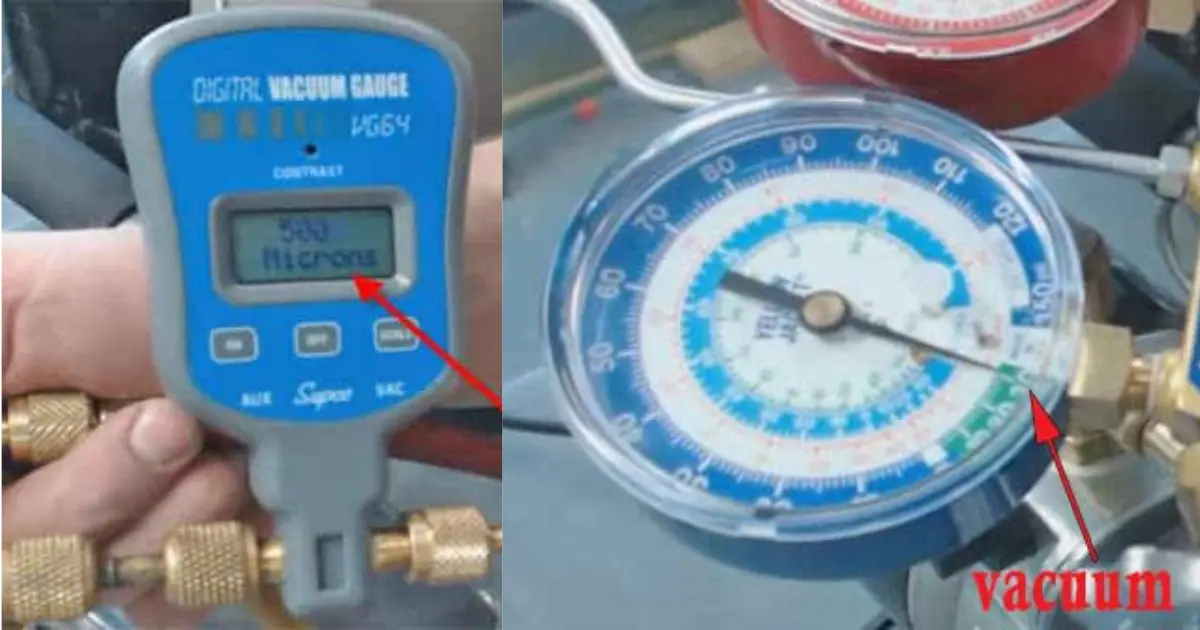
In the above image, we can see two devices fitted one is an analog pressure gauge showing the final negative reading, and another one is a digital vacuum gauge showing 500 microns as final reading, connected to the same line to ensure the system is 100% evacuated.
Liquid refrigerant charging
Liquid refrigerants are normally added to the liquid line following proper conditions. If any heating method is used to inject vapour refrigerant into the suction line, 100% vapour must enter the compressor.
Liquid refrigerant is incompressible and can cause severe damage to any compressor.
Refrigerant Gas charging
Refrigerant gas charging refers to the process of adding or replenishing refrigerant gas in a refrigeration, air conditioning, or HVAC (Heating, Ventilation, and Air Conditioning) system.
Always charge the vapor refrigerant from the point where the system pressure is lower than the pressure in the charging cylinder.
If we try to charge from the discharge side of the compressor, then instead of refrigerant going from the charging cylinder to the system, it may start reversing, filling the charging cylinder itself.
Remember that high pressure flows towards the lower side.
Only during refrigeration system evacuation or when the system is insufficient of refrigerant, the refrigerant can be inserted into both the high and low-pressure sides of the HVAC unit.
Mostly large charging cylinder has two valves. The red one is connected to the dip tube and is for liquid charging. The Blue one is connected from the top with no dip tube and is for gas charging. In both, the conditions cylinder is kept in an upright position while charging.
If the refrigerant charging cylinder has only one valve, then we don’t have a dip tube, and in this case, It’s necessary to invert the cylinder for liquid charging.
What is Copper Plating process in a refrigerating system?
When moisture is present in the system, it combines with the refrigerant to form an acidic solution.
This acidic solution dissolves copper tubings and extracts copper from copper-based alloys like brass or bronze present in different parts of an air conditioning system, mainly pipings.
This copper gets deposited into the compressor bearings and suction/discharge valves as a copper plating which may lead to refrigerant system leaks, long-running refrigeration plant, drop in the overall cooling efficiency of the refrigeration system, chocking of filter/drier, contamination of refrigerant, and oil.
Continuing with our vapor charging process, the charging cylinder can be weighed before charging by using a weighing scale.
Refrigerant Charging Methods:
Case 1: Refrigerant gas charging in ac | air conditioner
Refrigerant charging is the process of adding or replenishing refrigerant in a refrigeration, air conditioning, or HVAC (Heating, Ventilation, and Air Conditioning) system.
Considering that we have are very low in refrigerant and need to replenish whole of the system with a fresh charge.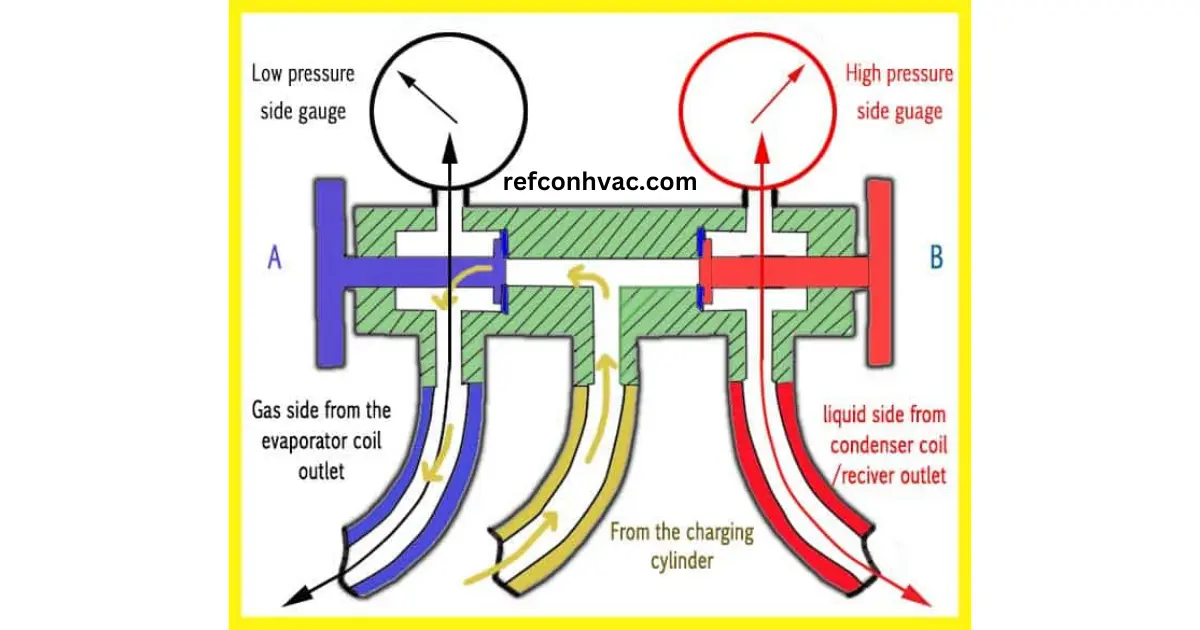
- Connect hose 2 and 3 connection to C and D, respectively.
- Both the gauges must be zeroed.
- Attach the temperature probe at the correct location near the sensing bulb to sense the degree of superheat.
- Evacuate the system into a recovery bottle by connecting the vacuum pump to charging hose 1, open both valves A and valve B till the evacuation process is complete (vacuum gauge reading showing 500 microns as final reading).
- Stop the vacuum pump after the system has evacuated, close the charging hose (1) valve going to the recovery bottle, check the pressure drop in the gauge for around 20 min to know if there is any leakage in the system.
- Disconnect the charging hose 1 from the vacuum pump and connect it to the blue connection of the charging cylinder for a gas charge.
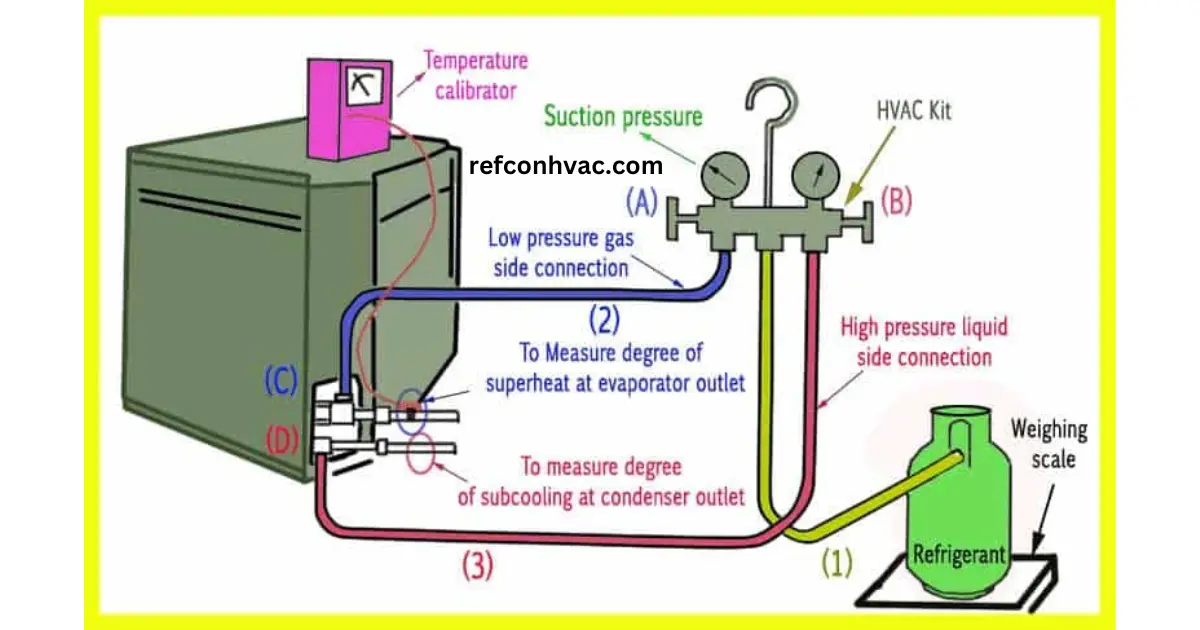
- Open valve A, slightly open the connection at C and purge the whole hose line from 1 to 2 by crack opening the gas valve of the refrigerant charging bottle; try not to avoid any excess leak directly into the environment.
- Same way, purge the high-pressure liquid side hoses from 1 to 3 to remove any air/moisture inside the hose.
- Now tight both the low and high-pressure side hose at position C & D, respectively as shown in the image.
- Start charging the gas refrigerant from the refrigerant bottle to the low-pressure side of the system at connection C by opening valve A and the refrigerant valve of the charging bottle until the vacuum comes to zero.
- Now start the compressor as the suction pressure goes above zero.
- After about 30 – 40 seconds of charging, close valve A and check the suction gauge pressure for a rise in pressure.
- Keep monitoring the degree of superheat by the temperature calibrator to ensure the liquid is not entering into compressor suction also; we can calculate how much charge present in the system by the pressure chart.
- If the superheat temperature is high, then it means the system is running low in refrigerant, whereas a lower superheat temperature than the desired reading means the system is overcharged.
- Repeat the procedure 10 to 11 until the suction pressure reaches 60 psi (as per maker). This avoids the risk of overcharging of the system also keeps measuring the refrigerant by the weighing scale.
- Once the refrigerant has charged, close the refrigerant valve, valve A and B and disconnect all the hoses, and secure everything.
CASE 2: Air Conditioning system: Low refrigerant charge
Low refrigerant charge or charging refrigerant without carrying out an evacuation process may cause the refrigerant to leak from the system into the environment.
So it’s better to find out the cause of low refrigerant, as many refrigerants are falling into the category of ozone layer depletion and global warming potential.
HFC refrigerant contains chlorine which reacts with ozone (O3) to convert it into oxygen (O2) hence leads to depletion of the ozone layer.
Major HFC refrigerants:
- R23
- R32
- R134a
- R404A
- R407A
- R407C
The ozone layer protects life on earth by absorbing ultraviolet rays from the sun; UV rays are responsible for skin cancer, genetic damage, and immune suppression in humans.
HFC refrigerants have a high global warming potential which can lead to increased sea levels, rising temperatures, and damage to habitats.
Now, coming back to charging up an HVAC system running short of refrigerant.
- Connect all the hoses 1, 2, and 3 with the HVAC kit.
- Purge air from the hose from 2 to 1 by tightening it at point C, valve A open, valve B closed, and connection to the charging cylinder slightly open for air purging, later close after purging.
- Likewise, air purge the high-pressure side hose 3.
- To keep the HVAC system running, we will open the charging cylinder gas valve, close valve B, and open valve A, allowing the refrigerant to charge into the system.
- Start charging the gas refrigerant to the low-pressure side of the HVAC system at connection C by opening valve A and the refrigerant valve until the vacuum comes to zero.
- Now start the compressor as the suction pressure goes above zero.
- After about 30 – 40 seconds of charging, close valve A and check the suction gauge pressure for a rise in pressure.
- Keep monitoring the degree of superheat by the temperature calibrator to ensure liquid refrigerant is not entering into compressor suction. Also, we can calculate how much charge is present in the system by the pressure chart.
- If the superheat temperature is high, then it means the system is running low in refrigerant, whereas a lower superheat temperature than the desired value means the system has overcharged.
- Repeat procedures 10 to 11 until the suction pressure reaches 60 psi (as per the maker). This avoids the risk of overcharging the system and also keeps measuring the refrigerant by the weighing scale.
- Once the refrigerant has charged, close the refrigerant valve of the refrigerant bottle, valves A and B, disconnect all the hoses, and secure everything.
Liquid refrigerant charging procedure for an air conditioner, window a.c (HVAC system)
Liquid refrigerant charging involves adding refrigerant to a system in its liquid state. Refrigerants can exist as either liquid or gas, depending on their pressure and temperature conditions.
Charging a system with liquid refrigerant is one of the procedures used to ensure proper and controlled addition of refrigerant.
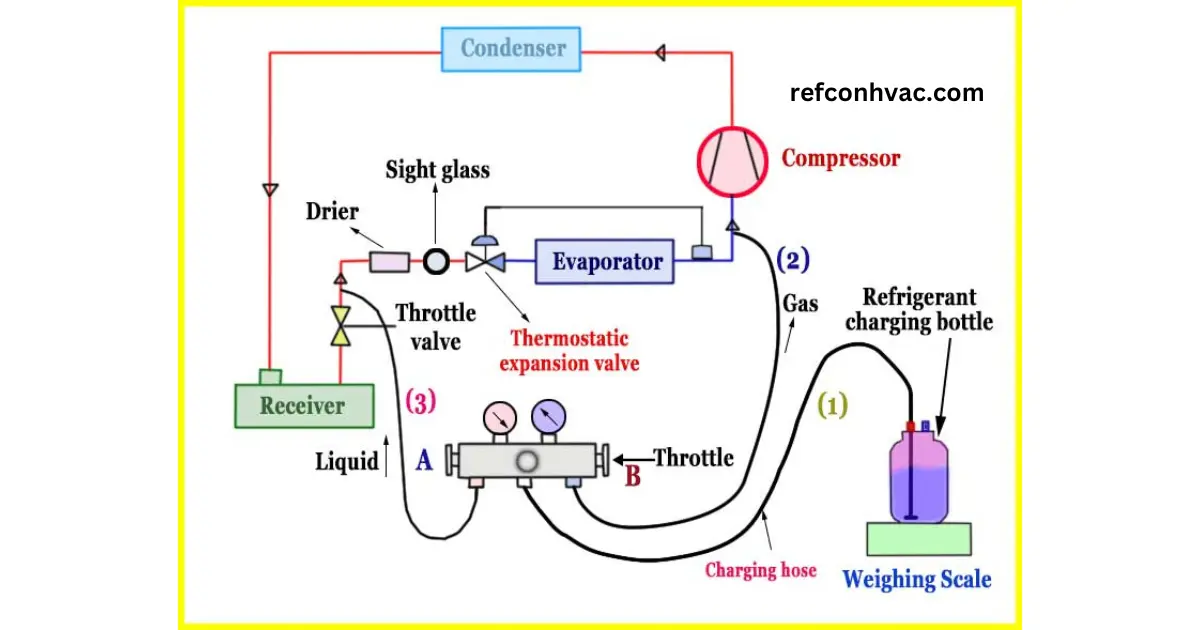
- Evacuate the system by pumping down the refrigerant into a recovery bottle using a vacuum pump.
- Connect the liquid and gas line hoses 2 and 3 and purge them.
- Connect the charging hose to the red connection of the charging cylinder for a liquid charge, and if only one connection is provided on the charging cylinder, then we need to invert the cylinder.
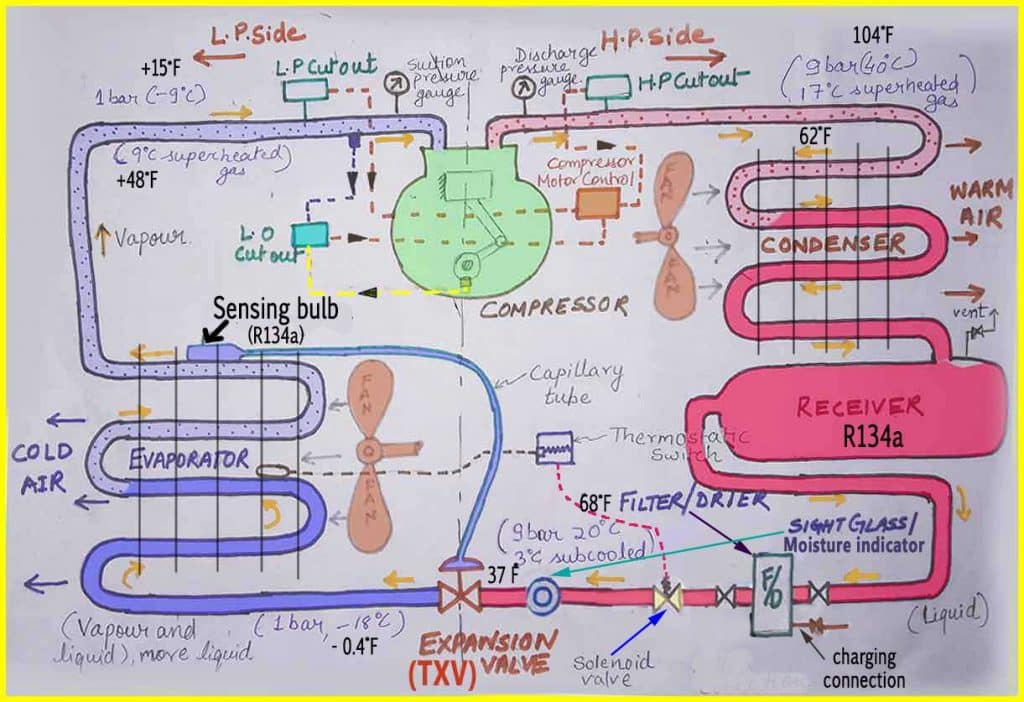
- Attach the temperature probe to the correct location near the sensing bulb to sense the degree of superheating and subcooling at the condenser outlet.
- Allow the liquid refrigerant to flow by opening valve A and keeping valve B closed.
- Since the system has a vacuum, the liquid refrigerant itself enters the system and move towards the evaporator and condenser until the pressure comes down to the charging cylinder pressure.
- The liquid refrigerant gets equally divided between the evaporator and the condenser, and no danger of liquid flooding exists inside the compressor.
- Start the compressor, as the refrigerant leaves the charging cylinder, the charging cylinder pressure decreases, so to maintain the flow, create negative pressure by partially closing the receiver outlet throttle valve and allowing the refrigerant to flow from the cylinder.
- In a refrigeration system, a receiver outlet is provided with a “king valve” used for liquid charging, also known as a throttle valve, and can trap the entire system refrigerant inside the receiver.
- This way, liquid refrigerant gets admitted safely, but since the throttle valve reduces the pressure across the expansion valve, the system doesn’t run normally.
- In between, close the refrigerant charging valve A, open the throttle valve fully, and check the temperature and pressure readings.
- When fully charged, the sight glass gets clear. Also, weigh the charging cylinder to know how much charge is required as per the maker for a full recharge
Liquid charging on large commercial plants:
Liquid charging is on a liquid line, and it must get vaporized before it reaches the compressor suction.
There is always a risk of liquid refrigerant entering compressor suction which can cause severe damage to the compressor as a liquid is non-compressible.
To avoid liquid going into the compressor, we usually charge before the thermostatic expansion valve (TXV) or metering device, which ensures the degree of superheat gets achieved (i.e., liquid converted to 100% vapor) before reaching compressor suction.
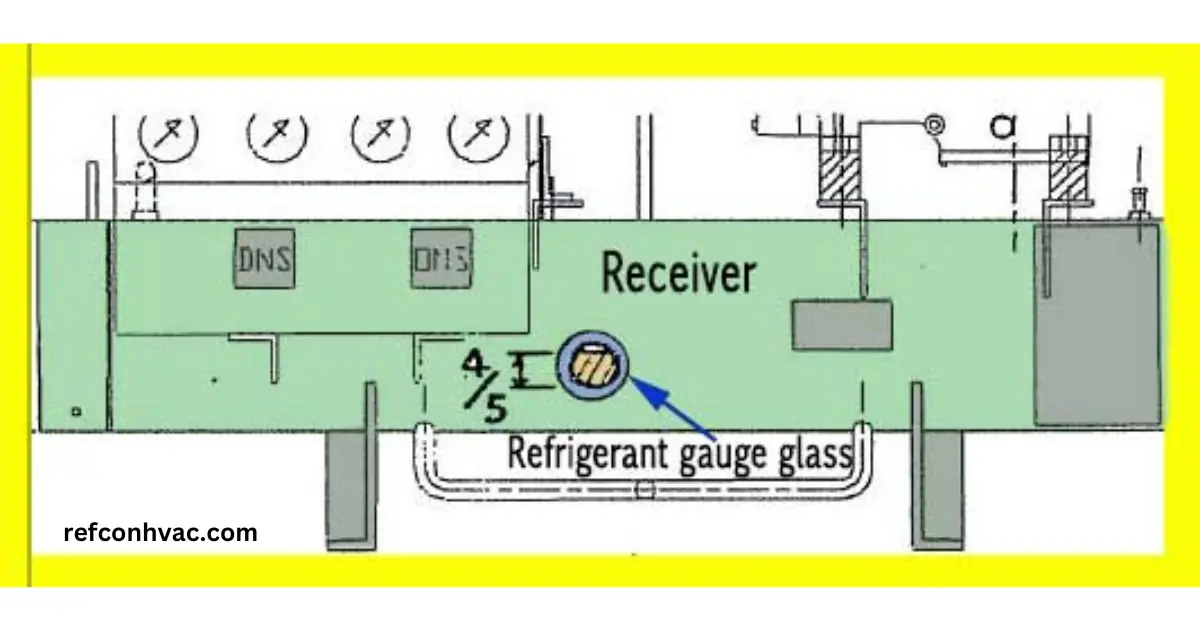
In large-scale commercial refrigeration, HVAC, or industrial plants, a sizable receiver tank is installed alongside the refrigeration system to gather and store all liquid refrigerant.
The receiver tank is equipped with a sight glass, allowing for the visual assessment of the refrigerant levels both during operation and when the system is idle. This sight glass serves as a crucial tool, providing insight into the refrigerant quantity and helping to prevent overcharging during the refrigerant charging process.
The procedure for refrigerant charging in large refrigerating plants are performed by pump down method. Pump Down means collecting refrigerant temporarily inside the receiver
- Start the cooling medium to the condenser (fan or water).
- Close the receiver liquid outlet valve.
- Start the compressor to suck the lower-pressure side of the refrigerant into the condenser.
- The compressor stops automatically as the low-pressure cutout switch gets activated (the set point at around 0.02Mpa).
- Connect the liquid line charging hose at the liquid side charging point, usually at the filter/drier, and purge it.
- Attach the temperature probe to measure the degree of superheat.
- Open the liquid charging valve of the charging cylinder and start the compressor.
- Keep measuring the degree of superheat. If the degree of superheat temperature is going down, start throttling the liquid refrigerant from the charging bottle.
- Keep an eye on the receiver gauge glass for an increase in level.
- Check the suction gauge, and once the desired pressure has reached as per maker, stop the compressor.
- Remove the charging connection, open the condenser outlet valve, and run the system normally.
- It’s vital to weigh the charging bottle before charging and log down the amount of refrigerant charged.
For small HVAC systems like split air conditioners, and window a.c, we do not have a refrigerant sight glass.
![]()
The charging cylinder uses tables and scales for different refrigerants at different temperatures so that we can make a very accurate refrigerant charge. This is critical for cooling or heat pump systems that do not use a receiver and that must be charged with exactly the refrigerant volume specified by the manufacturer.